NOTE: Source Code available for download at the bottom of the page
We will develop a Spring Web MVC based web application for employee enrollment. We will use Spring MVC Validation (jsr 303) using annotations for validating the enrollment form.
What is JSR 303?
JSR 303 is a framework for bean validation. Bean Validation defines a metadata model and API for JavaBean validation. JSR 303 provides us the feasibility to define the validations using constraint annotations on the model. Thus providing the coupling between the model attributes and the constraints. As defined, JSR 303 is an API and there are implementations available for it. We will be using implementation provided by hibernate called "Hibernate-Validator" for our Spring MVC validation.
For Example :
@NotNull(message="Field Required!") @NumberFormat(style = Style.NUMBER) @Min(1)
private Long employeeId;
The above code defines employeeId which shouldn't be null and Min declares the minimum value for the field. thus coupling validations and model attributes using annotations.
What's needed?
Overall design
Let's get started.
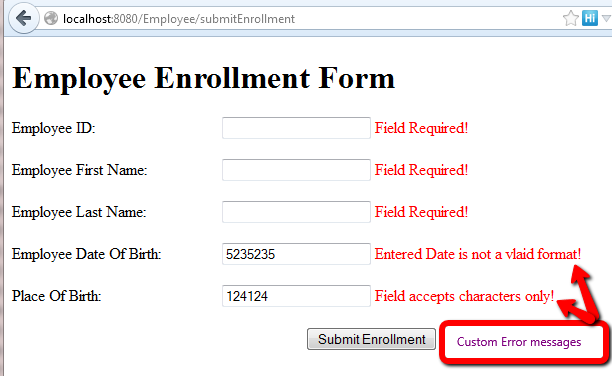
End Output:
Setup Eclipse Project
Create a dynamic web project using maven artifact "maven-archetype-webapp" as shown HERE.
Following Steps summarize the process for creating the Spring MVC project.
Step 1: Update POM file to get dependencies for Spring Web MVC
For Spring Web MVC jars + JSR 303 Implementation "hibernate-validator" + validation API
pom.xml
<dependency> <groupId>org.springframework</groupId> <artifactId>spring-webmvc</artifactId> <version>4.0.2.RELEASE</version> </dependency> <dependency> <groupId>javax.validation</groupId> <artifactId>validation-api</artifactId> <version>1.1.0.Final</version> </dependency> <dependency> <groupId>org.hibernate</groupId> <artifactId>hibernate-validator</artifactId> <version>5.1.0.CR1</version> </dependency> <artifactId>spring-webmvc</artifactId> gets all the Spring jars needed for Spring Web MVC <artifactId>validation-api</artifactId> API for bean validation <artifactId>hibernate-validator</artifactId> hibernate validator implementation of JSR 303
Step 2: Add declaration for Spring DispatcherServler servlet in web.xml.
web.xml
<!DOCTYPE web-app PUBLIC
 "-//Sun Microsystems, Inc.//DTD Web Application 2.3//EN"
 "http://java.sun.com/dtd/web-app_2_3.dtd" >

<web-app>
  <display-name>Employee Project SPRING WEB MVC</display-name>

  <servlet>
   <servlet-name>Employee</servlet-name>
   <servlet-class>org.springframework.web.servlet.DispatcherServlet</servlet-class>
   <init-param>
   	<param-name>contextConfigLocation</param-name>
    	<param-value>
        	 /WEB-INF/employee-servlet.xml
        </param-value>
   </init-param>
</servlet>

<servlet-mapping>
   <servlet-name>Employee</servlet-name>
   <url-pattern>/</url-pattern>
</servlet-mapping>

</web-app>
<servlet-mapping> for Employee forwards all the requested url's to servlet named Employee <servlet> declaration for Employee is defined as Spring DispatcherServlet. Upon initialization of a DispatcherServlet,
Spring MVC looks for a file named [servlet-name]-servlet.xml in the WEB-INF directory of your web application and createsthe beans defined there, overriding the definitions of any beans defined with the same name in the global scope.
If you want to name the context file with name different than [servlet-name]-servlet.xml , you can use
to define the location and file name.
Step 3: Create Web Application Context file.
employee-servlet.xml
<?xml version="1.0" encoding="UTF-8"?>
<beans xmlns="http://www.springframework.org/schema/beans"
	xmlns:xsi="http://www.w3.org/2001/XMLSchema-instance" xmlns:mvc="http://www.springframework.org/schema/mvc"
	xmlns:context="http://www.springframework.org/schema/context"
	xsi:schemaLocation="
        http://www.springframework.org/schema/mvc http://www.springframework.org/schema/mvc/spring-mvc-3.0.xsd
        http://www.springframework.org/schema/beans http://www.springframework.org/schema/beans/spring-beans-3.0.xsd
        http://www.springframework.org/schema/context http://www.springframework.org/schema/context/spring-context-3.0.xsd">

	<context:annotation-config />
	<context:component-scan base-package="com.visionjava" />
	<mvc:annotation-driven />

	<bean id="viewResolver"	class="org.springframework.web.servlet.view.InternalResourceViewResolver">
		<property name="cache" value="true" />
		<property name="prefix" value="/WEB-INF/jspPages/" />
		<property name="suffix" value=".jsp" />
		<property name="redirectHttp10Compatible" value="false" />
	</bean>

	 <bean id="messageSource"
          class="org.springframework.context.support.ReloadableResourceBundleMessageSource">
                <property name="basenames">
                 <list>
                   <value>classpath:/com/visionjava/employee/error</value>
                 </list>
               </property>
               <property name="cacheSeconds" value="3600"/>
         </bean>

</beans>
<context:annotation-config /> is used to activate annotations in beans already registered in the application context. Ex: @Autowired, @Resource, @Required, @PostConstruct <context:component-scan base-package="com.visionjava" /> scans the defined packages and registers the beans with application context(like controller, bean). <mvc:annotation-driven /> declares explicit support for new Spring MVC features like @Valid, @RequestBody, @RequestResponse etc. <bean id="viewResolver" class="org.springframework.web.servlet.view.InternalResourceViewResolver"> provides access to controller for the jsp pages under WEB-INF folder. It's a good practice to put all the jsp pages under WEB-INF folder to avoid giving direct access. Lets spend time examining the messageSource id we declared. We use Spring's ReloadableResourceBundleMessageSource to load our message resource files. Using propert "basenames" we provide the list of all our message resource files. ReloadableResourceBundleMessageSource gives us the feasibility to define time in milliseconds when the file is polled and any changes are loaded without redeploying the application. error.properties
typeMismatch.employee.dateOfBirth=Entered Date is not a vlaid format!
Pattern.employee.placeofBirth=Field accepts characters only!
Step 4: Create Model + Add constraint/validation.
Employee.java
package com.visionjava.employee.model;

import java.io.Serializable;
import java.util.Date;

import javax.validation.constraints.Min;
import javax.validation.constraints.NotNull;
import javax.validation.constraints.Pattern;
import javax.validation.constraints.Size;

import org.springframework.format.annotation.DateTimeFormat;
import org.springframework.format.annotation.NumberFormat;
import org.springframework.format.annotation.NumberFormat.Style;

public class Employee implements Serializable {

	private static final long serialVersionUID = 1L;

	@NotNull(message="Field Required!") @NumberFormat(style = Style.NUMBER) @Min(1)
	private Long employeeId;

	@NotNull(message="Field Required!") @Size(min=1,max=10)
	private String firstName;

	@NotNull(message="Field Required!") @Size(min=1,max=10)
	private String lastName;

	@NotNull(message="Field Required!")
	@DateTimeFormat(pattern = "MM/dd/yyyy")
	private Date dateOfBirth;

	@NotNull(message="Field Required!")
	@Pattern(regexp="^[A-Za-z]*$")
	private String placeofBirth;


	public Long getEmployeeId() {
		return employeeId;
	}
	public void setEmployeeId(Long employeeId) {
		this.employeeId = employeeId;
	}
	public String getFirstName() {
		return firstName;
	}
	public void setFirstName(String firstName) {
		this.firstName = firstName;
	}
	public String getLastName() {
		return lastName;
	}
	public void setLastName(String lastName) {
		this.lastName = lastName;
	}
	public Date getDateOfBirth() {
		return dateOfBirth;
	}
	public void setDateOfBirth(Date dateOfBirth) {
		this.dateOfBirth = dateOfBirth;
	}
	public String getPlaceofBirth() {
		return placeofBirth;
	}
	public void setPlaceofBirth(String placeofBirth) {
		this.placeofBirth = placeofBirth;
	}


}
Step 5: Create Controller
EmployeeController.java
package com.visionjava.employee.controller;

import javax.validation.Valid;

import org.springframework.beans.propertyeditors.StringTrimmerEditor;
import org.springframework.stereotype.Controller;
import org.springframework.ui.ModelMap;
import org.springframework.validation.BindingResult;
import org.springframework.web.bind.WebDataBinder;
import org.springframework.web.bind.annotation.InitBinder;
import org.springframework.web.bind.annotation.ModelAttribute;
import org.springframework.web.bind.annotation.RequestMapping;
import org.springframework.web.bind.annotation.RequestMethod;
import org.springframework.web.servlet.ModelAndView;

import com.visionjava.employee.model.Employee;

@Controller
public class EmployeeController {

	@InitBinder
	public void allowEmptyDateBinding( WebDataBinder binder )
	{
	    // tell spring to set empty values as null instead of empty string.
	    binder.registerCustomEditor( String.class, new StringTrimmerEditor( true ));

	}

	@RequestMapping("/")
	public String showHomePage(){
		return "employeeHomePage";
	}

	@RequestMapping(value="/enroll", method = RequestMethod.GET)
	public ModelAndView showEnrollmentPage(){
		ModelAndView modelAndView = new ModelAndView("employeeEnrollment");
		modelAndView.addObject("employee", new Employee());
		return modelAndView;
	}

	@RequestMapping(value="/submitEnrollment", method = RequestMethod.POST)
	public String submitEnrollment(@Valid @ModelAttribute("employee") Employee employee,
									BindingResult bindingResult, ModelMap modelMap ){

		if(bindingResult.hasErrors()){
			return "employeeEnrollment";
		}

		return "employeeHomePage";
	}

}
@Controller -- declares the class as Spring Controller type class. @RequestMapping("/")-- Annotation for mapping web requests onto specific handler classes and/or handler methods.In our case the homepage request is handled by this controller. The return value is resolved by the view resolver which appends the location and suffix for the string.
Step 6: Create JSP Page
employeeHomePage.jsp
<%@ page language="java" contentType="text/html; charset=ISO-8859-1" pageEncoding="ISO-8859-1"%> <%@ taglib prefix="form" uri="http://www.springframework.org/tags/form"%> <%@ taglib prefix="spring" uri="http://www.springframework.org/tags"%> <!DOCTYPE html PUBLIC "-//W3C//DTD HTML 4.01 Transitional//EN" "http://www.w3.org/TR/html4/loose.dtd"> <html> <head> <meta http-equiv="Content-Type" content="text/html; charset=ISO-8859-1"> <title>Employee Enrollment Form</title> </head> <body> <h1>Employee Enrollment Form</h1> <form:form name="employee" id="enrollmentForm" action="submitEnrollment" commandName="employee"> <table cellspacing="0" cellpadding="0" border="0" width="718"> <tr> <td>Employee ID:</td> <td><form:input path="employeeId" /> <form:errors path="employeeId" cssStyle="color:red"/></td> </tr> <tr> <td colspan="2"> </td> </tr> <tr> <td>Employee First Name:</td> <td><form:input path="firstName" /> <form:errors path="firstName" cssStyle="color:red"/></td> </tr> <tr> <td colspan="2"> </td> </tr> <tr> <td>Employee Last Name:</td> <td><form:input path="lastName" /> <form:errors path="lastName" cssStyle="color:red"/></td> </tr> <tr> <td colspan="2"> </td> </tr> <tr> <td>Employee Date Of Birth:</td> <td><form:input path="dateOfBirth" /> <form:errors path="dateOfBirth" cssStyle="color:red"/></td> </tr> <tr> <td colspan="2"> </td> </tr> <tr> <td>Place Of Birth:</td> <td><form:input path="placeofBirth" /> <form:errors path="placeofBirth" cssStyle="color:red"/></td> </tr> <tr> <td colspan="2"> </td> </tr> <tr> <td colspan="2" align="center"> <input type="submit" id="submitButton" name="enrollmentSubmit" value="Submit Enrollment"/> </table> </form:form> </body> </html>
Project Structure:
 |